Change language icons
Motivation
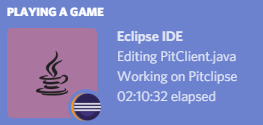
By default, the icon displayed on Discord is a flat icon of the programming language used in the active editor. Since the programming language is usually determined upon the edited file’s extension, editing a *.java file will show a Java icon on Discord:
However, you may want to use custom icons, because the default ones don’t suit you or because you’d like the icon to represent the project you’re working on instead of the programming language you’re using:
Credit
Limitations due to Discord API
Ideally, you would just have to provide the plug-in a set of icons and voilà, you would be done. However, at the moment Discord does not provide any API allowing developers to programmatically upload new icons. To overcome this limitation, here is what you have to do:
- Create a Discord application
- Upload your custom icons on this application
- Ask the Discord Rich Presence for Eclipse IDE plug-in to use your own Discord application
The following section explains step by step how to proceed.
Create a Discord application
- Connect to the Discord Developer Portal. You’ll have to login with your Discord credentials.
- Click on the
New Applicationbutton, on the top-right of the screen. - Type the name of your application. It will be shown on Discord instead of Eclipse IDE (which is the name of the default Discord application used by the plug-in).
- Click on
Create. - The main page of the application should open. Click on the Rich Presence item, which is in the menu navigation on the left.
- Click on
Add Image(s)in theRICH PRESENCE ASSETSsection. - A dialog should open. Select the icons you want to use then validate.
- A list of all the icons you selected should be displayed below. In order to register the icons, you still have to give each of them an ID. This ID is used by the Eclipse plug-in to select the right icon for the right language. See the table below for a list of available IDs.
- Click on
Save Changes.
| ID | File patterns |
|---|---|
| ada | *.ada |
| binary | *.bin |
| boo | *.boo |
| clojure | *.clj |
| cobol | *.cob, *.cbl, *.cpy |
| c | *.c, *.h |
| cpp | *.cpp, *.hpp |
| crystal | *.cr |
| css3 | *.css |
| csharp | *.cs |
| dart | *.dart |
| docker | Dockerfile |
| fortan | *.f, *.for, *.f90, *.f95, *.f03 |
| git | *.git, .gitignore, .gitattributes, .gitmodules |
| go | *.go |
| gradle | *.gradle |
| groovy | *.gvy, *.gy, *.gsh |
| haskell | *.hs |
| html5 | *.html |
| java | *.java |
| js | *.js |
| kotlin | *.kt, *.ktm, *.kts |
| bibtex | *.tex |
| lisp | *.lisp, *.lsp |
| lua | *.lua |
| markdown | *.markdown, *.mdown, *.md |
| ocaml | *.ml, *.mli |
| pascal | *.pas |
| php | *.php |
| prolog | *.pro, *.pl |
| python | *.py |
| r | *.r |
| ruby | *.rb |
| rust | *.rs, *.rlib |
| scala | *.scala, *.sbt |
| sql | *.sql |
| swift | *.swift |
| terminal | *.sh, *.bash, *.ksh |
| text | *.txt |
| ts | *.ts |
Configure the plug-in to use your application
Once your Discord application is ready you have to ask the Eclipse plug-in to use it:
- Open Eclipse IDE
- Click on
Windows>Preferences - Select
Discord Rich Presence>Icons - The following page should open:
- Check
Use custom application - Specify the ID of your application (it’s the
Client IDfield in your Discord application’s main page) - Click on
Apply
Discord should be updated with your own icons!
Tip
A custom Discord application can also be specified per project.